
A Wii Remote can have a steady player light and still leave you waving at a television with no pointer. That is frustrating, but it gives you a useful starting point: check whether the remote has connected before treating the missing cursor as a dead controller.
This guide covers the original Wii and Wii mini. Work through the checks below with the Wii Menu open, changing one thing at a time. A working pointer in the menu is a much clearer test than guessing what a particular game expects.
First, decide which problem you actually have
Nintendo's standard syncing instructions say the player light stops blinking and stays illuminated when pairing completes. If the lights keep flashing or go out, investigate batteries and syncing first. The Sensor Bar is the wrong place to start diagnosing an unpaired remote.
To pair on a standard Wii, turn the console on, open its front SD Card Slot cover, and find the red SYNC button. Press and release the remote's SYNC button, then press and release the console's button while the remote's lights are blinking. On Wii mini, the console button is beside its battery compartment. Sync each remote separately.

A steady light sends you toward the pointing setup
The Sensor Bar emits infrared light that the Wii Remote detects. Nintendo's missing-pointer guidance starts with its connection, placement and cable. Check that the small plug is seated in the Sensor Bar socket, then inspect the length of the cable for splits or fraying. Physical damage calls for replacement, not another sensitivity adjustment.
Next, look at the room from where you play. Bright lamps, sunlight and reflections can interfere; Nintendo also identifies infrared heat sources such as heaters, fireplaces and candles. Close the curtains or remove the competing source, then retest. Keep the remote's front window unobstructed, including by a slipped jacket.
Position matters more than turning everything up
Follow Nintendo's Sensor Bar placement instructions: center it above or below the screen. Above the television, keep it near the front edge. Below, put it at the front edge of the surface supporting the television, rather than down on a lower shelf. Match the console's Above TV or Below TV setting to that position.
For the initial test, stand directly in front of the television, roughly three to ten feet away, as Nintendo recommends. This gives you a consistent baseline. Moving the bar, changing the room lighting and swapping controllers simultaneously makes it harder to tell which change worked.

Use a camera to check the light you cannot see
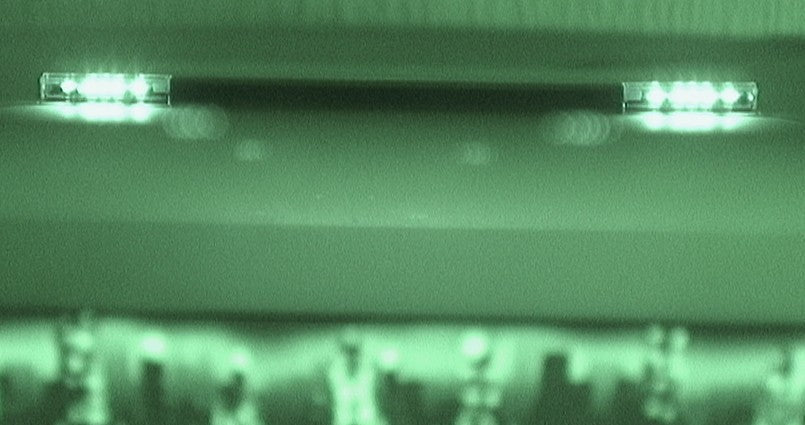
Nintendo documents a camera test for the Sensor Bar. Leave the bar connected and the Wii powered on, then point a digital camera or phone at its front. Through a suitable camera's display, five infrared lights should be visible at each end. Adjust the viewing angle slightly if necessary.
There is one important catch: some cameras filter infrared. Nintendo suggests trying the phone's front-facing camera in that situation. A dark picture from an unsuitable camera does not settle the diagnosis. Once you have a camera that can show the infrared output, missing lights point back toward the bar; visible lights let you move on to the remote and room setup.
Read the two-dot test correctly
If you can reach the settings, open Wii System Settings, go to page two, then choose Sensor Bar and Sensitivity. Nintendo's sensitivity procedure uses the plus and minus buttons until two blinking lights appear in the test area. Press A to finish.
Higher is not automatically better. Nintendo warns that higher sensitivity can make sunlight and other light or heat sources more troublesome. Three or more dots suggest competing sources. If the pointer is completely missing, Nintendo notes that reaching this check requires a Classic Controller or Classic Controller Pro.
Swap one known-working part before spending money
Try a fresh set of batteries and a second Wii Remote if one is available. If the second remote works in the same position with the same bar, the first remote becomes the likely culprit. If neither works, keep investigating the common setup rather than declaring both controllers broken.
The useful result is a specific observation: “paired, bar lights visible, second remote works” tells you far more than “the Wii is broken.” For separate maintenance jobs, see our controller-cleaning guide and retro video-cable setup guide.
Manufacturer guidance and image permissions checked October 11, 2026. Featured infrared photograph: Year of the Dragon / Josep Panadero, CC BY-SA 3.0, without cropping or compositional changes. Its night-vision appearance illustrates the Sensor Bar's infrared output; it is not an ordinary naked-eye view.


